Data Only Cell Phone Plan
In the Canadian market, the big 3 cell phone companies provide quite competitive movement towards the latest technologies but while having a unilateral decision to keep prices high. In provinces like Quebec where there exists smaller players, it is repeated proof that these smaller players provide top service with lower rates. With every steep discount the smaller players provide, suddenly all the big 3 and subsidiaries jump into the pool and offer competitive alternatives or sometimes straight out copies of the same plan.
The issue lies with the cellular data plans, they are quite expensive in Canada in average compared to the American counterpart. Where sometimes the same plan can cost roughly three times more in Canada.
Currently, many Canadians have worked around this monopoly by dropping from the conventional cellular plan. They opted to work with a Data only tablet plan, making and receiving phone calls through internet services over data. This may not be a fool proof or as reliable as a cellular plan, but with the quality of the Canadian telecommunications services for data, can provide a nearly identical service as making a conventional phone call.
The Result
The paths I’ve taken to an enlighten cell phone plan for cheaper calling, texting, and most importantly data, has lead me to a compromise and ridiculously cheap cell plan that drives down my monthly cost to only 23% of what I was paying before. Even more cheaper if you ever become aware of the loyalty discounts. I am quite happy with this alternative, with low call traffic and texting, it is a compromise I will make for sub par voice plan in exchange for more LTE data on the cheap.
The Setup
My current setup reflects on key points that I am aiming for which is reducing battery footprint on my phone as well keeping an easy solution to block callers before they reach my phone. The voice mail system requires human interaction, which weeds out most bot calls, unless they take the whole duration in which the system will automatically save the call.
As for call quality, it is great but that highly depends on your network, I normally drive while I get some calls through 3cx client, and call quality is fine unless I move too fast for LTE. Another issue I find is that given with the tunnel, it still does not bypass firewalls implemented at work places or free wifi locations such as Starbucks or Tims, a trade off for cheap data.
This solution only affects the voice calling as messages will still be dealt with an open source and free app, Voip.ms SMS client. I also suggest donating to the developer to thank them for spending time on giving the ability for many users to save on money and having an awesome interface for our messages.
Another good tool to check your balances and history is the Voip.ms console which provides an easy and quick access to your account. With this app you can edit many but not all aspects of your account when you aren’t near your computer.
The Process
A few things are needed to be open which should be pretty straightforward and won’t be touched on.
Open a data only plan with a carrier.
Open or use your existing Google account.
Open a voip.ms if you haven’t done so. If you want to test your toes before cancelling your voice data plan, use a temporary number from voip.ms for testing.
Acquire a 3cx Free edition by signing up to be emailed a license code https://www.3cx.com/phone-system/download-phone-system/ . You can ignore the free Google cloud for 1 year as we are going for long-term undetermined years with our method.
- Setup your Google cloud account with your existing Google account https://cloud.google.com/
- It will ask you for payment details, use your google wallet account or add a valid credit card. you won’t get charged for what we are doing if done properly
- If you open a new account, you will be put on a trial. You can stay on the trial as it will provide free $300 to play with. It is recommended to stay on this if you are a beginner, although you will need to confirm to leave the trial at the end of 1 year in order
Create a new project named 3cx-pbx
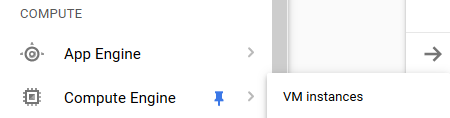
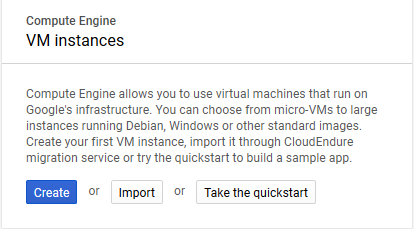
Click on Compute Engine > VM instances
Create your VM with these settings below, name is of preference,
Use a US region only - Excluding Northern Virginia, a region geographically closer to you the better. You can use http://www.gcping.com/ to determine which one has a better connection to you, the lower the better.
3cx can be installed on Debian 9, although Debian 10 is available on Google Cloud, it is not expected that 3cx will guarantee it work as they tend to move slower on the newly releases.
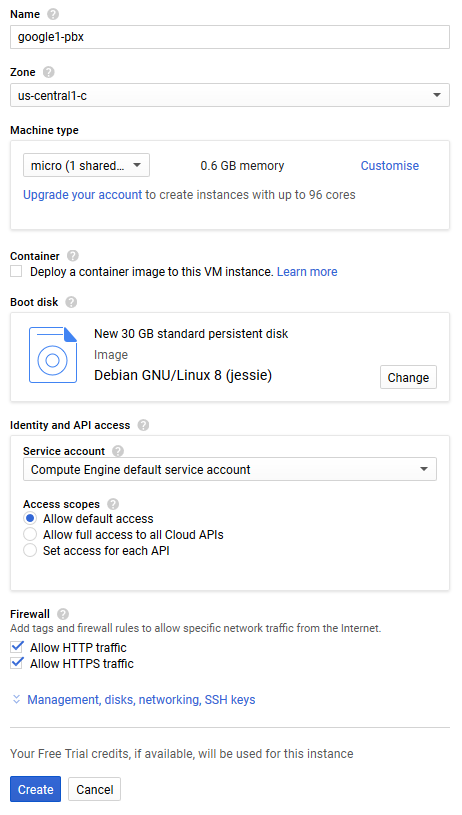
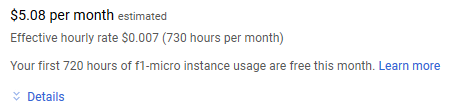
Ensure you see the free hours caption as it will give you enough time for 1 month usage.
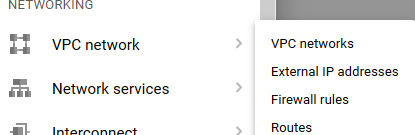
Now we will create a Firewall Rule, click on VPC network > Firewall Rules
Enter the settings below

Creating this rule allows internet traffic to reach our server.
-
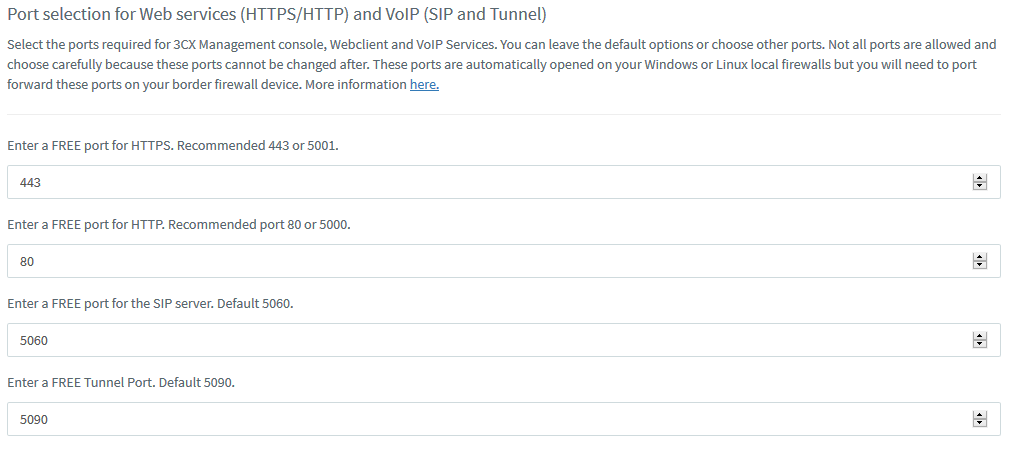
Port 5090 (inbound, UDP and TCP) for the 3CX tunnel.
-
Port 443 or 5001 (inbound, TCP) HTTPS for Presence and Provisioning, or the custom HTTPS port you specified.
Additional Ports for Remote Phones such as IP Phones can enable more ports:
-
Port 5060 (inbound, UDP and TCP), Port 5061 (inbound, TCP if using secure SIP) - already open if using SIP Trunks.
-
Port 9000-10999 (inbound, UDP) for RTP - already open if using SIP Trunks.
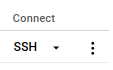
Now back to our VM instance, click on our server’s SSH button
It will open up a browser console to our server. copy and paste the code one line at a time below (separated by empty line). Ctl+Shift+V to paste
sudo -i

sudo apt update && apt install -y net-tools dphys-swapfile

echo '/swapfile none swap sw 0 0' | sudo tee -a /etc/fstab && echo 'vm.swappiness=10' | sudo tee -a /etc/sysctl.conf && echo 'vm.vfs_cache_pressure=50' | sudo tee -a /etc/sysctl.conf && tail /etc/sysctl.conf

sudo apt update && sudo apt upgrade -y

wget -O- http://downloads-global.3cx.com/downloads/3cxpbx/public.key | sudo apt-key add -

echo "deb http://downloads-global.3cx.com/downloads/debian stretch main" | sudo tee /etc/apt/sources.list.d/3cxpbx.list

sudo apt-get update && sudo apt-get install -y 3cxpbx
The last line will start up 3cx configuration.
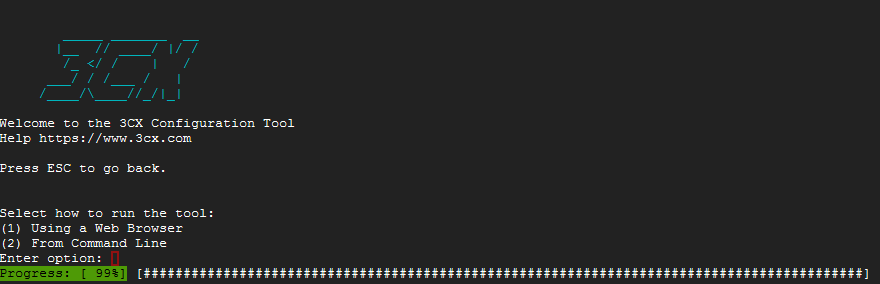
Enter 1 as the choice.

You will be told the link to visit, but since it’s an internal IP, we need to access it from it’s external IP.

In example, we would visit http://35.192.51.155:5015?V=2
http://IPhere:5015?V=2
-
Create new install of 3cx Phone System, enter your key from the email you signed up for.
-
Create a username and password. I suggest with the help of creation and saving with a password manager
-
Set the public IP to the one matching your server, should be the first option to match.
-
Static IP
-
This is a subdomain that you will reach your instance from. ie coolusername.3cx.us
-
-
Local IP
-
Two digit extensions
-
An email to receive alerts from your instance such as updates or failures.
-
Set your country and time zone
-
Set your contact profile on the Operator Extension page, this is your personal account
-
Select which countries you can make outbound calls to
-
Choose a language you would like your voice system to be in
-
Double check your 3cx account registration details
-
Save your installation details in a secure location!
-
Visit the link provided on the page. You link will vary heavily to mine depending on the region you chose: ie. https://coolusername.3cx.us:443 and login
-
On the left click on SIP Trunks, add SIP Trunk
-
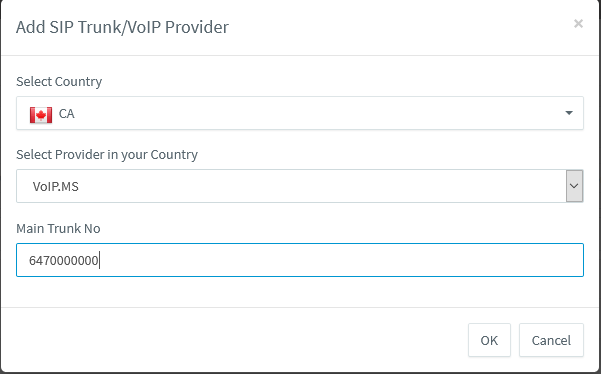 You can put the number you will later port, or the temporary number for testing
 -
 From your server console, you can try pinging various voip.ms servers close to your server region, it is not close to you as the voip.ms server will route traffic to your server and from your server to you for your calls.
ping newyork3.voip.msYou can stop the ping with Ctl+c , the lower the ping <10ms to your server would be ideal. Keep in mind of the IP address that is replying back to us. Another note is to use a sub account on voip.ms, this is a security conscious measure to not expose your administrative account on voip.ms for any voip client.
-
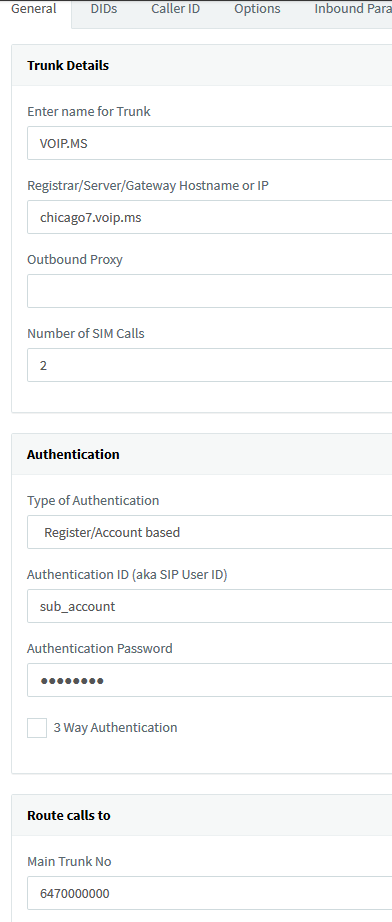
Under the options tab, you select Supports Re-invite, Re-Register Timeout to no more than 300 seconds as per voip.ms allowance. You can order around the codecs to your liking. Recommended order 1st to last: G729, G.711 U-law
-
Click OK on top once you are done, enable the trunk by selecting it and clicking on Enable All
-
Inbound Rules > Add DID Rule: Name voip.ms, extension group Default, route calls to you, OK to save
-
Outbound Rules > Add: Name voip.ms, extension group Default, outbound route 1-5 switch from “BLOCK CALLS” to voip.ms, OK to save
-
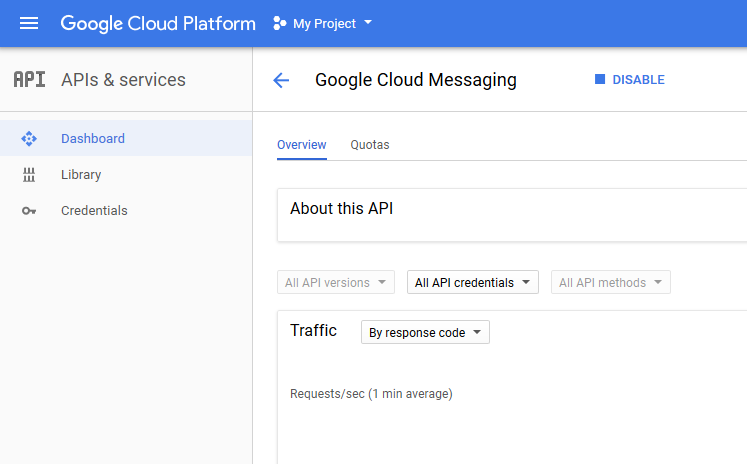
Settings > 3CX Client: Now switch to your Google cloud window, search Firebase Cloud Messaging API 3CX Guide
-
Create credentials > API Key: Edit settings and restrict the IP to your server’s external IP. This prevents something else from using your key, This key is your Server Key
-
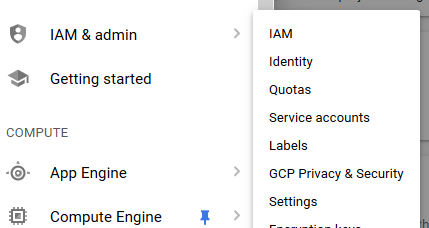 IAM & admin > Settings: Copy the project number and place that as your Sender ID, click OK to save
 -
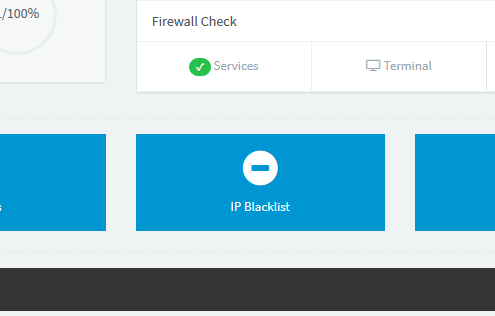 From the Dashboard, click on IP Blacklist
 -
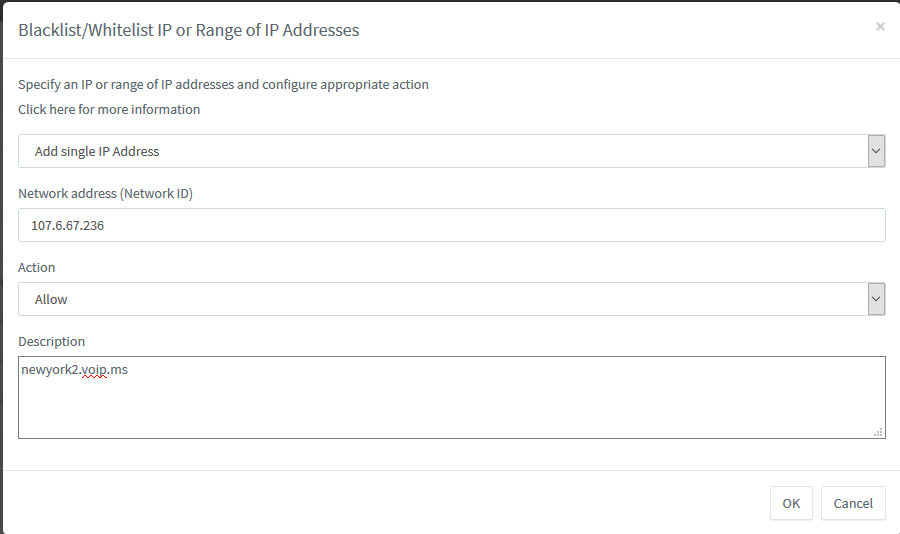 Similar to this, from your ping test to the nearest voip.ms server of choice, copy the IP address seen from Ping statistics into Network address. We want to avoid VOIP.MS from being banned by the PBX in case a hiccup causes authentication to fail.
 -
Last is to set up automatic backups on the Dashboard, as well as setting up automatic updates from the updates page (tab on top right). This is recommended for all users and makes the instance resilient from hackers!!! Your instance will always be scanned by bots and bruteforced against. You can set updates to be weekly at a time that interruptions can be made to your phoneline.
-
Download the 3cx client on Android or iPhone. Open up your email and tap the provision attachment which should open with the 3cx client
-
Once provisioned, test your outgoing first, failure to reach a signal means most likely your outbound rules are wrong. If inbound fails, make sure the voip.ms server sending the inbound call is the same one you are registering to from voip.ms.
-
Ensure that voip.ms sends calls with the max amount of rings/seconds, as the pbx will handle voicemail for you.
You should now have a successful system set up. Test out the solution to see if it works for you.
On iPhones, the new iOS aggressively closes apps to save power, so even 3cx might have trouble.
On terrible network connections from data or wifi, calls might take longer to reach you due to the implementation of push notifications.
It is not a perfect solution for everyone, but its the best one for my use.
Thanks for reading!